Thursday, June 23, 2011

Garden Party

Plant the seeds for a beautiful summer with flea market finds for the garden.


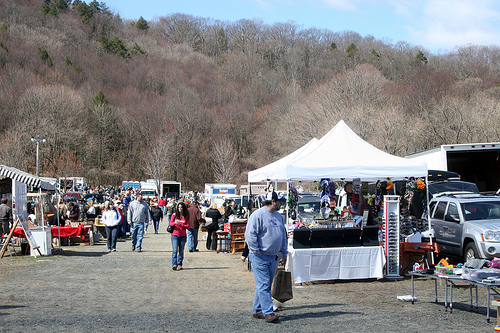
What's better than a flea market? A flea market with a view! We are lucky enough to have one of the largest--and most picturesque--swap meets in the country right here in our neck of the woods. The Alameda Point Antiques and Collectibles Faire is situated on San Francisco Bay, with panoramic views of the city's spectacular skyline. This scenic (and huge!) market is held the first Sunday of every month, and you can be sure you'll see us there with our sun-hats on and our handy cart in tow.


On our latest Alameda adventure, we were looking for unique items to give the backyard some springtime flair. We saw literally tons of statuary (it's usually made of concrete!), from a classic garden gnome to a pair of cement deer. Kitty collected a trio of rusty watering cans that would make playful planters. And Jennifer found a wrought-iron chair that would mix in well with her vintage chaise lounges--at only $15, it was worth hauling around the rest of the day. But we knew we hit pay dirt when we discovered dozens of berry boxes painted blue, green, red, and yellow. The vendor was asking $13 apiece, but since we picked out one of each, we talked him down to $10. We can't wait to get them home and plant some color in our garden!


Tools Paradise
If you've ever wanted to take up gardening, the flea market is an inspiring place to get outfitted. One-of-a-kind handicrafts, like a primitive wooden tool caddy with a branch for a handle, will add a level of artistry to your weeding. An old-fashioned find like a glass jar pump sprayer could lend a spritz of nostalgia to your bug killin'. Don't forget hand tools like claw tillers and trowels. Skip ones with split wood handles and loose heads and go for lightly worn tools. Their charm and history just may bring victory to your garden.


Cultivate Your Garden
Put your decorating skills to work outside by thinking of your yard as an open-air living room! To create a cozy niche, start by hanging a weathered windowpane from a shady tree. Give a wirework settee a fresh coat of paint and a comfy cushion for a pretty little perch. If you find an old dresser, turn it into a potting bench by removing the drawers and using the shelves to store terra cotta pots, herb markers, and twine. Finally, add a focal point with an Amish Barn Star recycled from a tin roof. Mother Nature will love what you've done with the place!


Expect To Pay
Hand Tools $1 to $8
Pump Sprayers $8 to $20
Wooden Tool Caddies $10 to $25
Watering Cans $10 to $30
Old Dressers $10 to $50
Weathered Windowpanes $10 and up
Whirligigs $20 and up
Concrete Garden Gnomes $25
Amish Barn Stars $35 to $80
Stained Glass Windowpanes $50 and up


Wednesday, June 22, 2011

Summer Vacation Junking Journey

It's always been our fantasy to roadtrip across the country and hit the best flea markets and antique fairs from sea to shining sea! 


Seattle Area, Washington 
Phinney Avenue and N. 34th Street 
Fremont, WA 
(206) 781-6776 
Every Sunday, Rain or Shine, Closed June 21 


San Francisco Bay area, California 
Main Street at Navy Way
Alameda, CA 
(510) 522-7500 
First Sunday of each month 


Los Angeles area, California 
Rose Bowl Stadium 
1001 Rose Bowl Drive
Pasadena, CA 
(323) 560-7469 
Second Sunday of each month 


Denver area, Colorado 
7301 S. Santa Fe Drive 
Littleton, CO 
(303) 974-0904 
First Saturday of each month 


An hour outside of Dallas, Texas 
800 Flea Market Road 
Canton, TX 
(903) 567-6556 
The weekend (Thurs-Sun) before the first Monday of each month 


Between Tupelo, Mississippi and Memphis, Tennessee 
10590 Highway 15 South
Ripley, MS 
(662) 837-4051 
The weekend (Thurs-Sun) before the first Monday of each month 


An hour outside of Chicago, Illinois 
Kane County Fairgrounds 
525 S. Randall Road St. 
St. Charles, IL 
(630) 377-2252 
The first Sunday and the Saturday right before it each month 


Cincinnati, Ohio area 
Boone County Fairgrounds 
5819 Idlewild Rd. (KY Route 338) 
Burlington, Kentucky 
(513) 922-6847 
Third Sunday of each month, April through October 


Near Cleveland, Ohio (45 minutes west of Cleveland) 
¼-mile west of Route 58 on Route 113 
Amherst, OH 
(440) 986-4402 
Every Wednesday and Saturday from 8AM to 4PM 


Half an hour from Allentown, Pennsylvania 
740 Noble Street
Kutztown, PA 
Mon -Thurs (570) 385-0104 
Fri- Sat (610) 683-6848 
Every Saturday 8AM to 4PM 


Near Danbury, Connecticut (5 miles) 
490 Federal Road 
New Milford, CT 
(508) 265-9911 
Every Sunday between April 4th and November 28th 


About an hour west of Boston, Massachusetts 
Brimfield, MA 
(413) 245-9471 
May 11-16, 2010, July 13-18, 2010, Sept 7-12, 2010 


Orlando area, Florida 
U.S. 441, just north of route 46 
Mt. Dora, FL 
(352) 383-8393 
Third weekend of each month

Dates and times may change.
Please call your flea market of choice to verify
before you load all the kids and Grandma into the RV and drive 400 miles!

Tuesday, June 21, 2011

Glitzy Lovebird Purse

Give a simple box a birdacious makeover with fancy stamps, copper leaf, and a whole lotta bling.


YOU'LL NEED
Materials
Unfinished wood box with hinged lid and clasp, 7½"x4¼"x4".
Brass handle clamps, 1¼", 2.
Brass D-rings, 5/8", 2.
Prickley Pear Flourished bird stamp (AddictedToRubberStamps.com).
Simply Stamps Garden Leaf foam stamp, 4"x4" (Plaid).
Simply Stamps double-sided foam alphabet stamps, Classic Alphabet (Plaid).
Folk Art acrylic paint, 2 fl. oz. each: Yellow Ochre, Apple Orchard, Cayman Blue.
Gold leaf liquid adhesive, 2 oz.
Copper leaf, 5½"x5½", 1 sheet.
Wooden doll head knobs, ¾", 4.
Oval rhinestones, turquoise and green mixed, 7.
Round rhinestones, copper, 38.
Round rhinestone, pink, 1.
Scrapbook paper, 8½"x11", magenta, 1.
Scrapbook paper, 8½"x11", purple, 1.
Mod Podge Gloss-Lustre, 4 oz.
Lime satin ribbon, 1¼" wide, 20" length.

Tools & Supplies
Foam paintbrush.
Small craft paintbrush.
Paper plate.
GOOP adhesive.
Fine sandpaper.
Mini screwdriver.

WHAT TO DO
1. Sand the edges and surfaces of the unfinished wooden box until smooth to the touch. Wipe clean. Squeeze a nickel-sized dollop of Yellow Ochre acrylic paint onto the paper plate. Thin the paint with about 2 tablespoons of water to create a wash. Apply the Yellow Ochre wash to all the outside surfaces of the wooden purse with the foam paintbrush. Let dry.

2. Dab the Apple Orchard green paint onto the leaf stamp using the foam paintbrush. Stamp the leaf image onto the purple paper and let dry. Cut out the leaf image leaving a 1/8" border of purple paper showing around the green leaves.

3. Dab the Cayman Blue paint onto the bird stamp using the foam paintbrush. Be careful not to get paint into the grooves. Stamp the bird image onto the magenta paper and let dry. Cut out the bird image leaving a 1/8" border of magenta paper showing around the bird.

4. To create the copper leafed letters that spell out L-O-V-E, dab the gold leaf adhesive onto each letter stamp, then stamp onto the magenta paper. Let dry for 15 minutes. Apply the sheet of copper leaf onto the stamped letters, then brush away the excess leaf with a dry craft paintbrush. Cut out each letter leaving no border.

5. To copper leaf the feet for the purse, set each doll head knob flat side down and use the foam paintbrush to paint the rounded surface with the gold leaf adhesive. Let dry for 15 minutes. Apply the copper leaf to the knobs, then brush away the excess leaf with a dry craft paintbrush.

6. Before you decorate the front of the purse, be sure to orient the box so the clasp will wind up on top and the hinges on the bottom. Paint the front of the box with a layer of Mod Podge. While the Mod Podge is still wet, press the leaf cutout onto the box. Add a layer of Mod Podge onto the top of the cutout and smooth down with your finger. Use the same technique to apply the L-O-V-E letters onto the front of the box. Then apply the cutout bird image and let dry.

7. Using the Goop adhesive, glue the four copper-leafed knob feet to the bottom four corners of the box. Let dry.

8. Open the box and coat the entire outside surface including the knob feet with a layer of Mod Podge. Be sure to leave the box open until it dries completely so it doesn't stick together. When dry, give it a second coat.

9. Glue the oval rhinestones onto the center of each leaf using the Goop adhesive. Glue the copper rhinestones onto the L-O-V-E letters. Then glue the pink rhinestone onto the bird's face to give him a sparkly eye.

1o. To create a handle for the box, slide the D-rings onto the handle clamps, then screw the clamps onto the top of the purse. Be sure to center the clamps front to back. Tie the ends of the lime satin ribbon to the D-rings and trim the ends.

Get Personal: Make this a personalized gift by stamping the recipient's name instead of the word LOVE.

Finishing School: For a fancy finishing touch, line the inside of the purse with adhesive felt. Simply cut pieces to fit, peel off the backing, and press into place.

Monday, June 20, 2011

Get A Breezy Island-Inspired Bath

Create your own little paradise with decorator touches inspired by the islands.

The island bath gets its inspiration from the white sand beaches and clear blue waters of the sunny tropics. To get this breezy look, combine natural basics with blue and green accents. Add seashells from your strolls on the sand and your favorite beach photo in a weathered wood frame, and your bathroom will take you back to the islands the moment you walk in the door.


Dabble In Water Colors
The island palette is a combination of tropical colors and sun-bleached neutrals. Start with a light colored room for that sun kissed, beachy look. Then add color with towels in ocean hues like turquoise and teal. An azure shower curtain and World Market's Green Bamboo Rug go well together without competing for attention. Once you establish an overall palette of blues and greens, bring in a designer touch with a punch of complementary color. A piece of red coral, a tangerine glass tray, or a sunny yellow perfume decanter will add a splash of style.

Show Off Your Seashells
Adding personal flair to your island bath is as simple as taking a sunset stroll down the beach. Decorating with seashells, sea glass, and snapshots from your trip not only enhances the décor, but also reminds you of those relaxing walks by the seashore. For a delicate jewelry display, arrange your rings and things in a scallop shell filled with sea glass. Tie a piece of twine around glass canisters and hang a seashell from each end of the knot. And place a gorgeous conch shell on the floor next to the tub as if it just washed up on the sand. You can almost hear the ocean.


Weave In Baskets
Go for wicker furnishings and hand woven baskets for storage in your island bath. Stick with a light straw color—painted white says Nantucket and dark rattan says Out of Africa. A woven flatware caddy sets just the right tone and makes a handy carryall for shampoo, shower gel, and a scrubby. And the next time you visit the Bahamas, head straight for the Straw Market and stock up on baskets. They are perfect for housing all kinds of bathroom sundries. Mini baskets make terrific catch-alls and a large bowl-shaped basket turns towel storage into a playful display. For larger items, a woven dresser is a tasteful hide-away.


Discover Underwater Treasures
Beachy accessories are so abundant, you could outfit a bathroom with seashells on everything from the soap dish to the Kleenex box cover. But the trick to creating a stylish retreat is to go easy on the matching accessories. To create a room that reminds you more of a relaxing visit to the Caymans than a display at a department store, seek out one-of-a-kind items that are more art than kitsch. One amazing shell art piece, such as a pearlescent shell-encrusted mirror designed by Heather Kendall of Elegant Shells, makes a bold and beautiful statement. A Capiz Shell Curtain from GAIAM draped over a turquoise shower sheer is another elegant seaside detail. Plus, it’s jewelry for your shower curtain!


Bask In Candlelight
Candles are wonderful by the tub and with today’s larger scale spaces you can bring in larger scale accents like Z Gallerie's Seahorse Candle Holders. The seahorses lend a little whimsy, and the weathered finish is modern and subdued. Bring in some color with aquamarine Island Flowers Pillar Candles from Illuminations, scented with mandarin, orchid, and coconut milk. The aroma alone will send you to the tropics.


Savor Citrus Scents
The scents of the islands are a blend of refreshing citrus, luscious fruits, and alluring botanicals. While vanilla, coconut, and coffee are common exports of the Caribbean, it is fragrances like orange blossom and gardenia that truly transport you to paradise. For your own island oasis, infuse the bath with tangerine-lime salts. Or treat yourself to kiwi-mango bubble bath and pink grapefruit body splash. Then celebrate your new tropical retreat with magnolia bath confetti.

Splash In The Falls
There's nothing quite as invigorating as a dip in a tropical stream. You can create that same unforgettable feeling by turning that ordinary shower into a cascading waterfall. Try the Cascadia showerhead by Waterpik, featuring an over-sized head and one hundred spray channels. Place Organize-It’s clear plastic Pebble Bath Tub Mat under your feet, and you’ll feel like you’re bathing under the falls of a secluded rainforest.


RESOURCES
Elegant Shells, www.elegantshells.com
GAIAM, www.gaiam.com
Illuminations, www.illuminations.com
Organize-It, www.organizes-it.com
Target, www.target.com
Waterpik, www.waterpik.com
World Market, www.worldmarket.com
Z Gallerie, www.zgallerie.com

Tuesday, June 14, 2011

Deck Out Your Deck In Seaside Style

Create your own "coastal" retreat with beachy flea market finds.

Seaside style is all the rage. And whether you live minutes from the shore or hours by plane, you can breathe the sea air by creating your own patio paradise. Coastal accents like glass floats, fishing nets, and even conch shells can be found at flea markets from Maine to Texas to Idaho. So get out your straw hat, pass the tanning butter, and get ready to turn your deck into a seaside oasis with these seven essentials for beach living.


1. Make A Cooler Table

You can't go to the beach without a cooler, so keep this flea market find by your side as a "seaside" table. Skip the modern plastic models and go for a vintage metal one in blue or silver (you can find one for between $5 and $25). Fill it with ice and this cool table earns its keep!


2. Go Blonde/Whitewash Furniture

Bleached wood and white wash paint a coastal scene. To get the look, simply paint flea market furniture white and use it outside. Look for bargains like dressers that have lost their drawers. The "shelves" are perfect for beach towels and flip-flops--even if you live in Kansas!


3. Catch A Net

Every seaside shanty has a net or two. This swap-meet regular makes a terrific outdoor curtain. Hang it from a long branch to create a virtual wall. Or make a chic, seaside swag by draping it from a tree. You can dress it up with shiny shell buttons for a little natural pizzazz.


4. Send A Message In A Bottle

Long for your own desert isle? Set the stage by adding a kooky message in a bottle to your island retreat. Just look for an old Coke bottle and a cork at the flea market and roll up a note inside: "Help! My umbrella has drifted to the other side of the glass!"


5. Make A Crate Great

Aged shipping crates abound at flea markets, and for some reason they are irresistible. So give up the fight and get a few favorites in different shapes and sizes. Turn each crate on its side and tack it up to your fence or wall for an instant outdoor shadowbox to showcase your shells. Now that sand dollar looks like a million bucks!


6. Get Out Your Beach Booty

Have piles of seashore finds from romantic walks on the beach, but no place to put them? Take your beachcombing skills to the flea market and search for half a dozen wire-clasp jars. Fill them with precious shells and sea glass for a splashy display of your tiny treasures. Just keep an eye out for pirates!


7. Hang A Sign And Hang Out!

No beach bungalow would be complete without a weatherworn sign, and the flea market is the perfect place to find one. If you see a sign that's peachy but not beachy, just paint it white and make your own. "Beach Access" is a classic, but "We're Happy As Clams" says it all.


Monday, June 13, 2011

Summer Lights

Bring the beach to your patio with a sparkly handcrafted candelier!

Glitz up your outdoor space by making your own candlelit crystal chandelier. With a simple hurricane candleholder, armature wire, and crystal beads, you can create a glamorous mood light for your deck. And for that seaside look, add sea glass, sand, or seashells. Make three candeliers to hang at different heights and you'll have the beginning of a romantic beach getaway in your own backyard.


For each candelier, you will need:

armature wire, 10 feet (1/8 inch diameter)
silver craft wire, 10 feet (26 gauge)
1 garden S-hook (3 1/2 inches long)
3 lengths steel jack chain, 1 foot long each (#16 size)
hurricane candleholder (5 1/2 inches tall)
white pillar candle (3 inches tall)
4 pieces of sea glass
1 cup of sand, shells, or sea glass
4 clear acrylic gems with holes for beading
12 clear iridescent bicone beads
needle nose pliers
wire cutters

Directions:
Step 1: Wrap the end of a five-foot length of armature wire around the top of the candleholder one time. Lock the wire tightly into place by folding the end back on itself as shown. Continue wrapping in the reverse direction, twisting three loops into the wire equally spaced around the perimeter to serve as hooks. Give each loop an extra twist to tighten as you go. Finish wrapping the wire and lock the end as before.

Step 2: Wrap the bottom of the candleholder with a two-foot length of armature wire and lock as before. Fold the long end under the bottom of the candleholder and fashion a swirl.

Step 3: Create the "S" shapes by bending a nine-inch length of armature wire. Make four total. Attach a piece of sea glass to each "S" using craft wire. Wrap with abandon!

Step 4: Create the gem danglies by threading a large gem onto a six-inch length of craft wire. Fold the wire in half and feed both ends through three bicone beads. Twist the wire into a loop and wrap the ends to secure. Make four total.

Step 5: Attach three lengths of chain to the garden S-hook. Open the bottom link of each chain using pliers and hook onto each armature wire loop at the top of the candleholder. Hang the candelier.

Step 6: Embellish by hooking three of the "S" shapes to the top lip of the candleholder and hang the last "S" shape from the bottom swirl of the candleholder. Then add a gem dangly onto the bottom link of each chain. Hook the last one onto the bottom "S" shape.

Finish your candelier by pouring one-inch of sea glass (or sand or shells) into the bottom of the candleholder. Set the candle inside. Pour the rest around the sides. Now grab your sweetheart and get those flames a-burnin'!

Colorful Twist: If your look is more ocean blue than seaside green, try using copper wire and cobalt sea glass instead.


Lip Tip: Make sure you select a glass candleholder with a lip at the top. That way the wire won’t slip off when you hang it.


Tip For The Landlocked: Is your nearest beach a thousand miles a way? Take a trip to your garden center for a bag of sand. Use the leftovers to make a sandcastle!


Friday, June 10, 2011

Alfresco Floorcloth

Transform your deck into an outdoor living room with a colorful floorcloth.


Get a jump on spring by creating your own painted patio rug. Go for an upscale look with dramatic color combinations and large stencils featuring ornate flourishes. Then coat your floorcloth with clear polyurethane to make it waterproof. Who knew you could have such a pretty rug outside?


WHAT YOU'LL NEED
Primed heavy-duty "10 ounce" cotton canvas, 40 inches by 52 inches
Renaissance Tulip StenSource stencil
2" Floral Flourishes Border StenSource stencil
7" Balmoral Border StenSource stencil
7" Acanthus Border StenSource stencil
Cadmium Yellow Light acrylic paint, 4-ounce tube
Cadmium Red Medium acrylic paint, 4-ounce tube
Turquoise Green acrylic paint, 4-ounce tube
Ultramarine Blue acrylic paint, 4-ounce tube
Water-based clear polyurethane, 1-pint can
Elmer's carpenter glue
High-quality, synthetic bristle paintbrush, 2-inches wide
Foam stenciling sponge or spouncer, 1.25" size
Blue painter’s masking tape
Scissors
Yardstick
Colored chalk


WHAT TO DO
Step One
Paint the entire surface of the canvas yellow and let dry. Use the tape to mask off the border, then paint the border red-orange. Create the decorative pattern by taping each stencil down and applying the paint with the spouncer. Dab small amounts of paint into the openings, being careful not to get the paint under the stencil. (For best results, wash each stencil between applications with soap and water.)

Step Two
When the paint is dry, seal the canvas with the clear polyurethane using the bristle paintbrush. Allow the polyurethane to dry for at least 2 hours. Flip the canvas over and seal the underside. Let the canvas dry for at least 2 more hours.


Step Three
To create a tidy hem, turn the floorcloth face down. Starting at the corner, measure 12 inches up each side and mark with the chalk. Draw a diagonal line from one chalk mark to the other. Cut the corner off along the chalk line. Repeat for all four corners. Fold each side in 6 inches and crease, then glue the edge of the hem down with the carpenter's glue. Let the glue set for 30 minutes. Finally, place your new floorcloth on your patio and fire up the grill!

No-Slip Tip: Keep your rug from becoming a flying carpet with a few strips of anti-slip tape. You can find it at hardware stores.

Canvas Primer: If you can't find primed canvas, buy regular canvas and prime it yourself with 2 coats of gesso or white latex primer.

Wednesday, June 8, 2011

Garden Variety

In the spring it's tempting to race to your local home improvement store to get all new stuff for the patio. But wouldn't it be more fun--and economical--to shop for one-of-a-kind garden delights at your local swap meet? You can outfit your whole backyard in just one trip, and it will look like you spent years carefully collecting your garden treasures.


Easy Chairs
We see all kinds of patio furniture at the flea market throughout the year. But as the weather gets warmer, we see more and more. On this trip, we spotted a turquoise wicker sofa and chair. Kitty was drawn in by the color, but when we checked them out up close, we could see they were missing some of their curlicues and had some mildew staining. Although they could easily be cleaned, it would be hard to repair the broken wicker spirals, so she passed.


We found dozens of wrought iron patio chairs, something our friend Margaret was on the hunt for. Last year she bought a vintage glass table that seats six, but it didn't come with chairs. So since then, she has been buying the chairs one at a time, mixing and matching their designs. She intends to tie the whole set together by spray painting them all lemon yellow. This trip she picked up a café chair with oak leaves in the seat back for only $20. The same seller had a classic Adirondack chair with a worn paint finish that we all admired. He said the chair was invented in the early 1900s and that if you found an original made by Harry Bunnell, it could cost more than $1000. We all agreed that an Adirondack chair just feels like summer. Makes you want to lean back and sip lemonade!


Sculpture Garden
In springtime, nearly every booth at the flea market has a backyard Bambi or stone squirrel begging us to take him home. This trip seemed to have a pond theme because we saw several cement frogs, a huge turtle, and two glorious swans--and that was in the first hour! Kitty gushed over a three-foot copper heron that would make a regal sentinel standing guard over her vegetable garden. But the seller wanted $275, so we kept on looking. Later in the day, we saw a kooky cast-iron statue of a mermaid. She'd be a riot reclining on a chaise in the backyard. Jennifer managed to keep her cool when she asked the price. $150? Sold! It's a good thing flea markets have heavy-duty carts you can borrow. That mermaid weighed a ton!


Hot Pots
We both have a bit of a green thumb, so interesting planters were on our list. One vendor had wooden window boxes for $25 each. They were super weathered and would look at home hanging on a wooden fence. Another had a six-foot-tall wall planter perfect for trailing plants--and also perfect for privacy. We laughed that $175 is a bargain if you have nosy neighbors!


Just a few aisles over were a pair of concrete Grecian urns like the ones we had by the pool growing up. Our mom liked the classical drama they added, especially with giant scheffleras planted in them. Cement urns get a gorgeous patina as they age, and the ones we had in Florida were always covered in a pretty green moss. Our reminiscing convinced Margaret to buy two! The booth next door was filled with shabby chic pieces, including a flower cart straight out of My Fair Lady. Jennifer wanted to turn it into a portable English garden, but the dealer wanted $195. Too bad the mermaid ate her whole budget!

Related Posts Plugin for WordPress, Blogger...